How to Learn APIs in JavaScript by Building a NASA Image Viewer
In this tutorial, we are going to explore the world of APIs by building a real-time NASA Image Viewer. We will see what APIs are and what they do, and then leverage NASA’s Astronomy Picture of the Day (APOD) API to build a cool web app to dynamically fetch data and display images. A special shout out to NASA for making to their APIs available for free. This tutorial is a great way to get hands-on experience with JavaScript APIs and create something cool using the powerful data NASA provides!
Prerequisites
Before we get started, make sure you have a basic understanding of HTML, CSS, and JavaScript.
- Basic Understanding of HTML, CSS, and JavaScript: Familiarity with the fundamental concepts of HTML for structuring web pages, CSS for styling, JavaScript and JQuery for adding interactivity is essential. This tutorial assumes a basic knowledge of these languages.
- Web Browser: Use a modern web browser like Google Chrome, Mozilla Firefox, or Microsoft Edge.
For the purpose of this tutorial, you can download the source files for the app to help you follow along:
Note: As you test the source files, ensure that you load them within a suitable environment such that all the files are loaded. For offline use, we recommend that you use Live Server and vscode to load the files. Simply open the files in Vscode and run “index.html” using Live Server.
Demo
Here is the web app, we are going to create.
What is an API?
Ever wondered how different apps “talk” to each other? That’s where APIs come in! Think of an API (Application Programming Interface) as a set of rules that lets software programs share information. Instead of building everything from the ground up, you can tap into existing services and grab the data you need.
In this example we are going to use NASA’s APOD API, however this just one example of an API. There’s a whole universe of APIs out there, both free and paid, that can supercharge your projects. Some popular free APIs include OpenWeatherMap (for basic weather), and various public government datasets. Paid APIs, like those from Stripe (for payment processing) or Google Maps Platform (for advanced mapping), offer more robust features and support. The API you choose depends entirely on your project’s needs.
Before you can use any API, you may need an API Key to help you interact with the API. The steps below will help guide you on how to get one.
How to get an API Key
First, it is worth noting that every API has unique steps to followed in order to get an API key so it is advisable to visit the API publisher’s website to see how you can get an API key. For the case our NASA API, we are going to use the following steps:
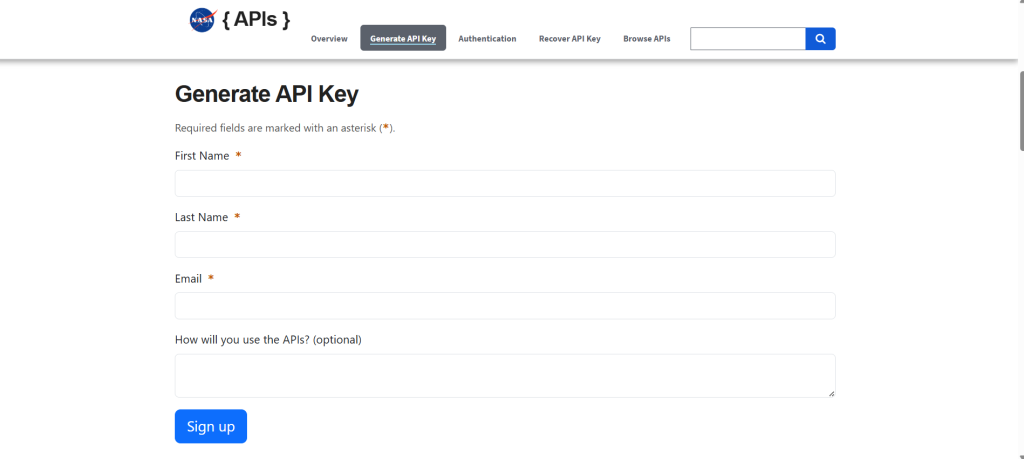
- Go to NASA’s API Portal: Visit https://api.nasa.gov/.
- Sign up for a free API key: Click on “Generate API Key” and fill in your details.
- Copy your API key: It will be displayed after registration.
- Use the key in your code: Replace
"DEMO_KEY"with your personal key:
Now, your API requests will be authenticated, increasing the request limit significantly and preventing the 429 error.
Lets get started
Let’s start by setting up the basic HTML structure for our project. Create an HTML called “index.html”, with a basic HTML web format, and add a canvas element. This is the basic HTML layout of our viewer, which consists of:
<!DOCTYPE html>
<html lang="en">
<head>
    <meta charset="UTF-8">
    <meta name="viewport" content="width=device-width, initial-scale=1.0">
    <title>NASA Image Viewer</title>
</head>
<body>
    <div class="viewer">


        <span class="widgets">
            <span class="description">
loading...

            </span>
            <span class="controls">
                <input type="date" id="date_inpt"></input>
                <button id="get_btn">Get Image</button>

            </span>
        </span>
    </div>


</body>
</html>
2. Styling the Web App
Lets add some CSS to the improve the look of the app as shown below. We will do this by adding a style tag (<style>) in which we shall place our CSS for the app.
<style type="text/css">
     body{
        margin: auto;
     }
     .viewer{
        display: flex;
        flex-direction: column;
        width: 100vw;
        height: 100vh;
        justify-content: end;
        background: linear-gradient(#222,#000);
     }
     .widgets{
        padding: 50px;
        display: flex;
        flex-direction: column;
        align-items: center;
        gap: 25px;
     }
     .controls{
        background: #4ea3ed;
        padding: 10px;
        border-radius: 5px;
        display: flex;
        flex-direction: row;
        justify-content: center;
        gap: 10px;
        width: fit-content;
     }
     .controls>input{
        background: none;
        border: none;
        color: #fff;
        font-weight: bold;
        font-size: 16px;
     }
     ::-webkit-calendar-picker-indicator{
        background-color: #fff;
        cursor: pointer;
     }
     .description{
    color: #fff;
    width: 100%;
    text-align: center;
     }
     #get_btn{
        background-color: #fff;
        border: none;
        color:#4ea3ed;
        font-size: 16px;
        padding: 10px;
        cursor: pointer;
     }
</style>
3. Lets Add the JavaScript
Now comes the magic! We are going to use JavaScript and jQuery to fetch data from NASA’s API when the user clicks the “Get Image” button. jQuery provides access to the $.ajax() function, which helps us retrieve the data asynchronously from the API without reloading the page.
When the request is successfully, we can then replace the background of the html viewer and also change the text in the description tag.
<script type="text/javascript">
$(document).ready(function(){  // Ensure the DOM is fully loaded before running the script

    var api_key = "DEMO_KEY";  // Store the API key to be used for making requests to NASA's API

    // Function to update the message displayed in the description section
    function display_message(msg){
        $(".description").html(msg);  // Insert the given message into the .description element
    }

    // Event listener for the "Get Image" button click
    $("#get_btn").click(function(){

        var date = $("#date_inpt").val();  // Retrieve the date selected by the user from the input field

        // Check if the user has selected a date
        if (!date) {
            display_message("Please select date!");  // Display a message if no date is selected
            return;  // Exit the function early if no date is provided
        }

        // Construct the API URL using the base URL, API key, and the selected date
        let url = `https://api.nasa.gov/planetary/apod?api_key=${api_key}&date=${date}`;

        // Make an AJAX request to the NASA API using the constructed URL
        $.ajax({
            url: url,  // Set the URL to the one we've created
            method: "get",  // Specify that we want to make a GET request to the API
            success: function(response) {  // This function runs if the request is successful
                if (response) {  // Check if the response contains valid data
                    var background = $(".viewer");  // Select the viewer element
                    background.css("background", `url("${response.url}")`);  // Set the background image to the image URL returned by NASA API
                    display_message(response.explanation);  // Display the explanation of the image from the API response in the description area
                }
            },
            error: function() {  // This function runs if there is an error with the API request
                display_message("Failed to fetch API data!");  // Display an error message if the API request fails
            }
        });
    });
});
</script>
Conclusion
As you can see, with just a few lines of HTML, CSS, JQuery and JavaScript, we have created a API based app. You can further improve this by adding more features like image zoom, error handling, or even fetching a random image each time! Hopefully, this tutorial gives you a great starting point for understanding how APIs work and how to integrate them into your web apps. We would love to see what you create. Feel free to leave comment below. Happy coding!