Creating Your First Chrome Extension
Have you ever wanted to customize your browsing experience or add new functionalities to Chrome? Chrome extensions allow you to do just that! In this article, we will walk you through the process of creating your very first Chrome extension. No prior experience with Chrome extensions is required, so let’s get started.
What is a Chrome Extension?
A Chrome extension is a small software program that customizes the browsing experience. It can change the browser’s behavior, add new features, or modify the content of websites. Extensions are built using web technologies like HTML, CSS, and JavaScript.
Prerequisites
Before we get started, make sure you have a basic understanding of HTML, CSS, and JavaScript.
- Basic Understanding of HTML, CSS, and JavaScript: Familiarity with the fundamental concepts of HTML for structuring web pages, CSS for styling, and JavaScript for adding interactivity is essential. This tutorial assumes a basic knowledge of these languages.
- Web Browser: Use a modern web browser like Google Chrome, Mozilla Firefox, or Microsoft Edge.
For the purpose of this tutorial, you can download the source files to help you follow along:
Note: As you test the source files, ensure that you load them within a suitable environment such that all the files are loaded. For offline use, we recommend that you use Live Server and vscode to load the files. Simply open the files in Vscode and run “index.html” using Live Server.
Demo
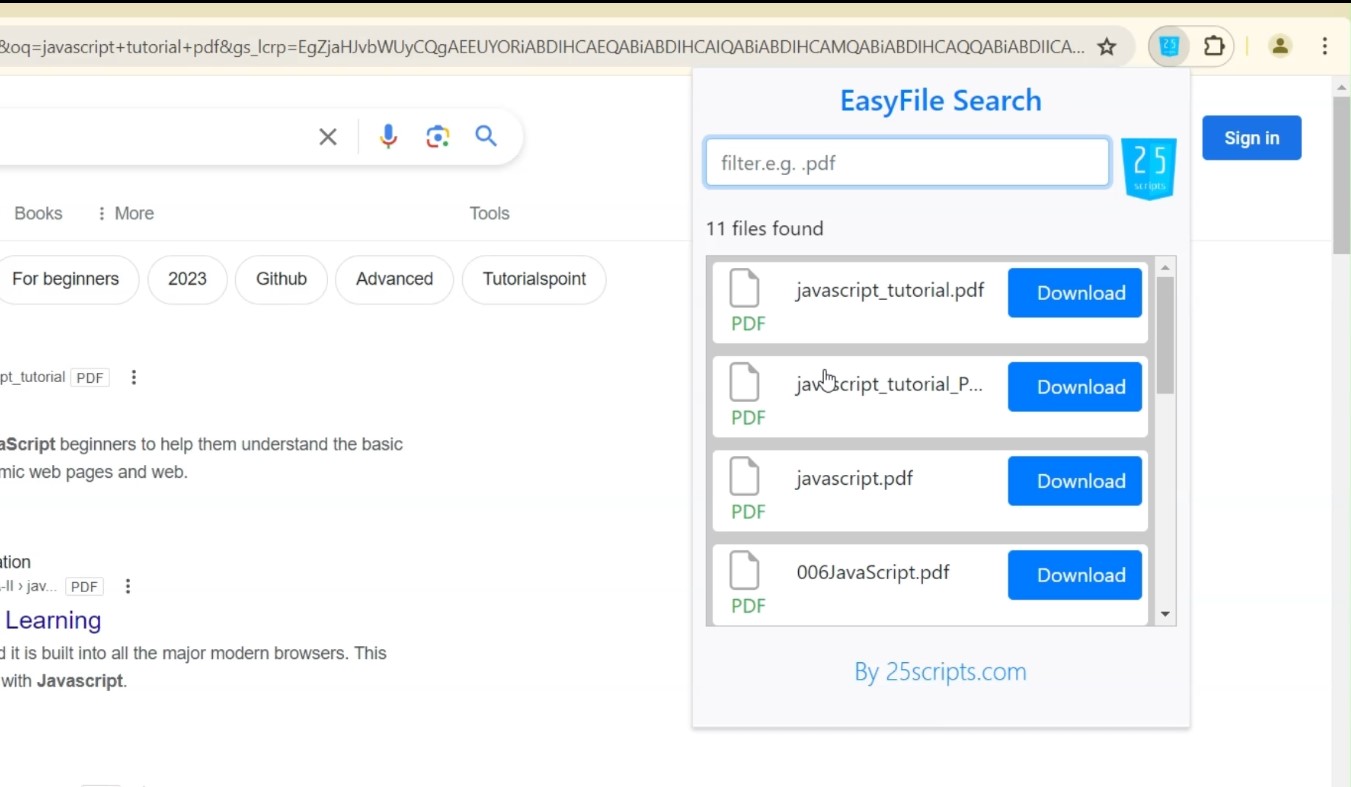
Here is what we are going to create. A simple chrome extension to capture all downloadable files on a web page and enable the user to download them easily.
Basic Architecture of Chrome Extensions
In general, chrome extensions consist of five key components: the manifest file, background scripts content scripts and various UI elements like popups and options pages. These elements work together to customize and enhance the browsing experience. Getting to know the basic architecture of Chrome extensions is super important for building them smoothly. Let’s take a look at each of the key components:
- Manifest File (
manifest.json):- This file is the blueprint of your extension. It provides important information such as the extension’s name, version, description, and permissions. It also specifies the files and resources your extension uses.
- Background Scripts:
- These are JavaScript files that run in the background and manage the extension’s lifecycle. They can listen for browser events, make network requests, and manage state. Background scripts can be persistent or event-driven (non-persistent).
- Content Scripts:
- These scripts are injected into web pages and can interact with the DOM of the pages. They allow your extension to read and modify the content of web pages. Content scripts have limited access to Chrome APIs but can communicate with other parts of the extension.
- UI Elements:
- Extensions can have various user interface components such as:
- Browser Actions: These add an icon to the browser toolbar and can have a popup.
- Page Actions: These add an icon to the address bar that can be shown or hidden depending on the page.
- Popups: These are HTML files that are displayed when the user clicks the extension icon.
- Options Pages: These allow users to configure the extension’s settings.
- Side Panels: These provide a persistent UI that can be displayed alongside web content.
- Extensions can have various user interface components such as:
- Permissions:
- Permissions are declared in the manifest file and specify what APIs the extension can use and what data it can access. Examples include access to the user’s tabs, bookmarks, or browsing history.
- Icons:
- Icons represent the extension in the Chrome toolbar, extension management page, and the Chrome Web Store. These are typically provided in different resolutions (16×16, 48×48, 128×128).
Step 1 : Setting the Project
Let’s start by organizing our project directory and setting up the necessary files:
- Create a Project Directory: Open your preferred development environment and create a new directory named
easyfile-search-extension. - Project Structure: Inside your project directory, create the following files:
manifest.json: Defines extension metadata and behavior.popup.html,popup.css,popup.js: Interface for the extension’s popup.background.js: Handles background tasks and events.content.js: Content script that interacts with web pages to extract file information.- Additional assets like icons (
logo.png).
Step 1 : Setting the Project
Lets create the manifest file for the project. The manifest file is key as it configures how your extension behaves and interacts with Chrome.
{
    "name":"EasyFile Search",
    "version":"1.0",
    "description":"Chrome extension to find downloadable files on website.",
    "permissions":["tabs","downloads"],
    "host_permissions":[],
    "background":{
        "service_worker":"background.js"
    },
    "icons":
    {
        "16":"assets/logo.png",
        "32":"assets/logo.png",
        "64":"assets/logo.png"
    },
    "content_scripts":[
        {
        "matches":["<all_urls>"],
        "js": ["content.js" ]
        }
    ],
    "web_accessible_resources":[
        {
            "resources":[  "assets/assets/logo.png"],
            "matches":["<all_urls>"]
        }
    ]
    ,
    "action":
        {


        "default_icon":
        {
            "16":"assets/logo.png",
            "32":"assets/logo.png",
            "64":"assets/logo.png"
        },
        "default_title":"EasyFile Search",
        "default_popup":"popup.html"
        },


        "manifest_version":3


}
Lets breakdown it part of the manifest file:
- Name (“
name"): Specifies the name of your extension as it appears in the Chrome Web Store and browser toolbar. - Version (“
version“): Indicates the current version of your extension. Update this value when releasing new versions with added features or bug fixes. - Description (“
description“): Provides a brief overview of what your extension does, helping users understand its purpose and functionality. - Permissions (“
permissions“): Declares which Chrome APIs your extension requires access to. In this example,"tabs"allows access to browser tabs for querying active tabs, and"downloads"permits downloading files using the Chrome Downloads API. - Host Permissions (“
host_permissions“): Optionally specifies which host permissions your extension needs to access external domains or resources. This array remains empty in our example, as our extension operates within the context of any webpage ("<all_urls>"). - Background (“
background“): Defines a service worker script ("background.js") that runs in the background, handling events like extension startup, network requests, and persistent data storage. This script is essential for managing extension functionality that doesn’t require user interaction, such as initiating downloads in response to user actions. - Icons (“
icons“): Specifies icons of different sizes (16x16,32x32,64x64pixels) that represent your extension in the Chrome interface. These icons ensure your extension is visually identifiable in the browser toolbar, extensions menu, and Chrome Web Store listings. - Content Scripts (
"content_scripts“): Defines scripts ("content.js") injected into web pages that match specified URLs ("<all_urls>"). Content scripts interact with and modify the content of web pages to enhance functionality or gather information, such as extracting file links in our EasyFile Search extension. - Web Accessible Resources (“
web_accessible_resources“): Lists resources ("assets/logo.png") accessible to web pages matching"<all_urls>". This ensures that content such as images or scripts bundled with your extension can be loaded and displayed correctly on any webpage where your extension operates. - Action (“
action“): Specifies the extension’s behavior when the user interacts with its icon in the browser toolbar. - Default Icon (“
default_icon“): Defines icons displayed in the toolbar at different sizes. - Default Title (“
default_title“): Sets the tooltip text displayed when hovering over the extension icon. - Default Popup (“
default_popup“): Links to the HTML file ("popup.html") that defines the popup interface when the extension icon is clicked. This interface provides a user-friendly way to interact with the extension’s features directly from the browser.
Step 2: Create the Popup
Let’s create the popup that will be displayed when the user clicks the extension icon. Create a file named popup.html in your directory and add the following code. This HTML file includes a simple UI with a filter input and display field for the detected files. We also link a JavaScript file, popup.js, which will handle the functionality of the extension in the background.
<!DOCTYPE html>
<html lang="en">
<head>
    <meta charset="UTF-8">
    <meta name="viewport" content="width=device-width, initial-scale=1.0">
    <link href="bootstrap-4.4.1.css" rel="stylesheet" type="text/css"></link>
    <script type="text/javascript" src="jquery-3.4.1.min.js"></script>
    <script type="text/javascript" src="bootstrap-4.4.1.js"></script>

    <link href="popup.css" rel="stylesheet" type="text/css"></link>
    <title>EasyFile Search</title>
</head>
<body>
    <div class="main shadow-lg bg-light bg-gradient">
        <span class="h4 text-primary w-100 text-center">EasyFile Search</span>
        <span class="filter">
            <input placeholder="filter.e.g. .pdf" type="text" id="filter" class="form-control"></input>
            <img src="assets/logo.png" class="logo brand" title="25scripts.com"></img>
        </span>
        <span class="status">
             <div class="progress" id="progress">
                <div class="progress-bar progress-bar-striped progress-bar-animated bg-primary" role="progressbar" aria-valuenow="100" aria-valuemin="0" aria-valuemax="100" style="width: 100%"></div>
              </div>
              <span style="display: none;" id="message">No files found</span>
        </span>

    <span class="view" id="view">


    </span>

        <span class="props rounded">

                <div  class="link text-primary lead brand">By 25scripts.com<div>
        </span>

        </div>


        <div style="display:none;">
            <div class="file_widget rounded" id="file_view_template" title="template.pdf">
                <span class="icon">
                <svg  xmlns="http://www.w3.org/2000/svg" width="32"